CentOS 7에서 lsyncd와 rsync를 사용하여 파일의 실시간 동기화를 설정하는 방법
테스트 환경
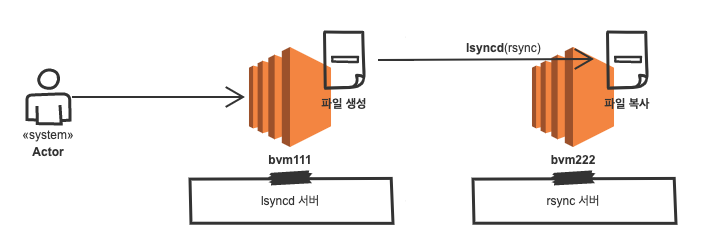
아키텍처

운영체제 정보
$ cat /etc/redhat-release
CentOS Linux release 7.9.2009 (Core)
서버 정보
| 서버명 | 아이피 | 비고 |
| bvm111 | 111.111.111.111 | source |
| bvm222 | 222.222.222.222 | targe |
lsyncd와 rsync 설치
bvm111 서버와 bvm222 서버에 lsyncd, rsync 패키지 설치
EPEL 저장소 설치
sudo yum install -y epel-releaselsyncd, rsync 패키지 설치
sudo yum install -y lsyncd rsynclsyncd 설정 파일 확인(lsyncd.conf)
sudo vim /etc/lsyncd.conf----
-- User configuration file for lsyncd.
--
-- Simple example for default rsync, but executing moves through on the target.
--
-- For more examples, see /usr/share/doc/lsyncd*/examples/
--
sync{default.rsyncssh, source="/var/www/html", host="localhost", targetdir="/tmp/htmlcopy/"}lsyncd.conf 설정 파일의 주요 옵션
- sync 블록: 동기화할 대상을 지정합니다.
- source 옵션: 동기화할 원본 디렉토리를 지정합니다.
- target 옵션: 동기화할 대상 디렉토리를 지정합니다.
- rsync_options 옵션: rsync 옵션을 지정합니다.
lsyncd 데몬의 주요 옵션
- logfile 옵션: lsyncd 데몬의 로그 파일 경로를 지정합니다.
- pidfile 옵션: lsyncd 데몬의 PID 파일 경로를 지정합니다.
- status_interval 옵션: lsyncd 데몬의 상태를 확인하는 간격을 지정합니다.
- delay 옵션: 동기화 작업을 수행하기 전에 지연하는 시간을 지정합니다.
참고
- lsyncd 데몬은 rsync를 사용하여 동기화를 수행합니다. 따라서 rsync가 설치되어 있어야 합니다.
- lsyncd 데몬은 inotify를 사용하여 파일 시스템의 변경 사항을 감지합니다. 따라서 inotify가 활성화되어 있어야 합니다.
rsyncd 설정 파일 확인(rsyncd.conf)
sudo vim /etc/rsyncd.conf# /etc/rsyncd: configuration file for rsync daemon mode
# See rsyncd.conf man page for more options.
# configuration example:
# uid = nobody
# gid = nobody
# use chroot = yes
# max connections = 4
# pid file = /var/run/rsyncd.pid
# exclude = lost+found/
# transfer logging = yes
# timeout = 900
# ignore nonreadable = yes
# dont compress = *.gz *.tgz *.zip *.z *.Z *.rpm *.deb *.bz2
# [ftp]
# path = /home/ftp
# comment = ftp export area서비스 시작 및 활성화
더보기
---
lsyncd 서비스 시작 및 활성화
- lsyncd 서비스를 시작하고 부팅 시 자동으로 시작하도록 활성화합니다.
systemctl --now enable lsyncd.servicersyncd 서비스 시작 및 활성화
- rsyncd 서비스를 시작하고 부팅 시 자동으로 시작하도록 활성화합니다.
systemctl --now enable rsyncd.service---
logrotate 설정 파일 생성 또는 편집
sudo vim /etc/logrotate.d/lsyncd/var/log/lsyncd/lsyncd.log {
daily # 일일 로테이트
rotate 7 # 최대 7일까지 로그 보관
compress # 로그 압축
missingok # 로그 파일이 없어도 오류 무시
notifempty # 비어 있지 않은 파일만 로테이트
create 0644 root root # 로테이트된 로그 파일 생성 권한 및 소유자 지정
}bvm111 서버에서 bvm222 서버로 실시간 동기화
- 출발지(source) : bvm111, /apps/file
- 목적지(target) : bvm222, /apps/file
- 사용자 계정 : oracle
bvm111 서버 - lsyncd 설정
lsyncd 설정 파일 편집
vim /etc/lsyncd.conf$ vim /etc/lsyncd.conf
----
-- User configuration file for lsyncd.
--
-- Simple example for default rsync, but executing moves through on the target.
--
-- For more examples, see /usr/share/doc/lsyncd*/examples/
--
-- sync{default.rsyncssh, source="/var/www/html", host="localhost", targetdir="/tmp/htmlcopy/"}
settings {
logfile = "/var/log/lsyncd/lsyncd.log",
statusFile = "/var/log/lsyncd/lsyncd.status",
insist = true,
statusInterval = 10
}
sync {
default.rsync,
source = "/apps/file/",
target = "222.222.222.222::filesync",
}lsyncd 서비스 시작 및 활성화
systemctl --now enable lsyncd.servicelsyncd 서비스 재시작
systemctl restart lsyncd.servicelsyncd 서비스 상태 확인
systemctl status lsyncd.service$ systemctl status lsyncd.service
● lsyncd.service - Live Syncing (Mirror) Daemon
Loaded: loaded (/usr/lib/systemd/system/lsyncd.service; enabled; vendor preset: disabled)
Active: active (running) since 금 2021-01-22 16:01:06 KST; 17s ago
Main PID: 4434 (lsyncd)
Tasks: 1
Memory: 456.0K
CGroup: /system.slice/lsyncd.service
└─4434 /usr/bin/lsyncd -nodaemon /etc/lsyncd.conf
1월 22 16:01:06 bvm111 systemd[1]: lsyncd.service failed.
1월 22 16:01:06 bvm111 systemd[1]: Started Live Syncing (Mirror) Daemon.** lsyncd.conf 설정 파일에서 주석은 -- 입니다.
bvm222 서버 - rsyncd 설정
rsyncd 서비스 시작 및 활성화
systemctl --now enable rsyncd.servicersyncd 설정 파일 편집
vim /etc/rsyncd.conf$ vim /etc/rsyncd.conf
# /etc/rsyncd: configuration file for rsync daemon mode

# See rsyncd.conf man page for more options.

# configuration example:

# uid = nobody
# gid = nobody
# use chroot = yes
# max connections = 4
# pid file = /var/run/rsyncd.pid
# exclude = lost+found/
# transfer logging = yes
# timeout = 900
# ignore nonreadable = yes
# dont compress   = *.gz *.tgz *.zip *.z *.Z *.rpm *.deb *.bz2

# [ftp]
#        path = /home/ftp
#        comment = ftp export area
#
[filesync]
path = /apps/file
comment = filesync
uid = oracle
gid = oracle
use chroot = yes
read only = no
hosts allow = 111.111.111.111
max connections = 10
timeout 600rsyncd 서비스 재시작
systemctl restart rsyncd.servicersyncd 서비스 상태 확인
systemctl status rsyncd.service$ systemctl status rsyncd.service
● rsyncd.service - fast remote file copy program daemon
Loaded: loaded (/usr/lib/systemd/system/rsyncd.service; enabled; vendor preset: disabled)
Active: active (running) since 금 2021-01-22 15:36:37 KST; 3min 43s ago
Main PID: 15328 (rsync)
CGroup: /system.slice/rsyncd.service
└─15328 /usr/bin/rsync --daemon --no-detach
1월 22 15:36:37 bvm222 systemd[1]: Started fast remote file copy program daemon.
1월 22 15:36:37 bvm222 rsyncd[15328]: rsyncd version 3.1.2 starting, listening on port 873
이제 lsyncd와 rsync를 사용하여 CentOS 7에서 파일의 실시간 동기화가 설정되었습니다. /원본/디렉토리에서 파일을 수정하면 해당 변경 사항이 /대상/디렉토리로 자동으로 복사됩니다. 설정 파일을 원하는 대로 조정하여 파일 동기화를 사용자 정의할 수 있습니다.
'리눅스' 카테고리의 다른 글
| [draft] 웹 서버에서 리다이렉션 설정하는 방법 (0) | 2025.10.31 |
|---|---|
| [draft] 우분투에서 UTF-8 언어셋으로 변경하는 방법 (0) | 2025.10.31 |
| [draft] 리눅스 환경에서 rsync 명령어로 데이터 동기화하는 방법 (0) | 2025.10.31 |
| [draft] rsync 스크립트 (0) | 2025.10.31 |
| [draft] 우분투에 rsync를 설치하고 설정하는 방법 (0) | 2025.10.31 |


